RPM Fusion’s mirrorlist server which are returning a list of (probably, hopefully) up to date mirrors (e.g., http://mirrors.rpmfusion.org/mirrorlist?repo=free-fedora-rawhide&arch=x86_64) still have been running on CentOS5 and the old MirrorManager code base. It was running on two systems (DNS load balancing) and was not the most stable setup. Connecting from a country which has been recently added to the GeoIP database let to 100% CPU usage of the httpd process. Which let to a DOS after a few requests. I added a cron entry to restart the httpd server every hour, which seemed to help a bit, but it was a rather clumsy workaround.

It was clear that the two systems need to be updated to something newer and as the new MirrorManager2 code base can luckily handle the data format from the old MirrorManager code base it was possible to update the RPM Fusion mirrorlist servers without updating the MirrorManager back-end (yet).

From now on there are four CentOS7 systems answering the requests for mirrors.rpmfusion.org. As the new RPM Fusion infrastructure is also ansible based I added the ansible files from Fedora to the RPM Fusion infrastructure repository. I had to remove some parts but most ansible content could be reused.

When yum or dnf are now connecting to http://mirrors.rpmfusion.org/mirrorlist?repo=free-fedora-rawhide&arch=x86_64 the answer is created by one of four CentOS7 systems running the latest MirrorManager2 code.

RPM Fusion also has the same mirrorlist access statistics like Fedora: http://mirrors.rpmfusion.org/statistics/.

I still need to update the back-end system which is only one system instead of six different system like in the Fedora infrastructure.

This one has been in the making for quite a while, but after some struggling terminatorX has once again reached a release-worthy state. While regular users may not notice a lot of changes right away, this is probably one of the biggest change sets yet. Among a lot of smaller fixes release 4.0.0 brings:

  • Port to Gtk+3, which lead to some unexpected ramifications
  • New audio driver backend for PulseAudio
  • The old X11-DGA based mouse grab mode was incompatible with Gtk+3, so terminatorX now reads from /dev/input/mice directly (when run setuid-root) or falls back to the good old pointer-warp mode (potentially losing some precision compared to reading the events directly from Linux input). The good thing is that both methods should also work for upcoming display server technologies replacing X11.knob-4.0.0
  • The icons now adapt to the configured font size; the knob has been re-rendered to adapt to high-dpi displays (automatic size adjustment can be overridden via configuration)needle-4.0.0
  • The turntable cursor (or needle) now has a short trail (can be switched off) and the audio zoom level can be adjusted using the mouse wheel

terminatorX 4.0.0 is now available from the download page; pre-built packages for Ubuntu 16.04 are available in the terminatorX PPA.

There have been two protocol related issues with MirrorManager open for some time:

Both issues have been resolved. The first issue, to drop FTP URLs from the metalinks, has been resolved in multiple steps. The first step was to block FTP URLs from being added to Fedora’s MirrorManager (Optionally exclude certain protocols from MM, New MirrorManager2 features) and the second step, to remove all remaining FTP URLs from Fedora’s MirrorManager, was performed during the last few days and weeks. Using MirrorManager’s mirrorlist interface (which is not used very often) only returned FTP if the mirror had no HTTP(S) URLs. So it was already rather unusual to be redirected to a FTP mirror. Using MirrorManager’s metalink interface returned all possible URLs for a host. With the removal of all FTP URLs from MirrorManager’s database no user should see FTP URLs any more and the problems some clients encoutered (see Drop ftp:// urls from metalinks) should be ‘resolved’.

The other issue (Add a way to specify you want only https urls from metalink) has also been solved by adding a protocol option to the mirrorlist and metalink back-end. The new MirrorManager release (0.7.2) which includes these changes is already running on the staging instance and the result can be seen here:

To have more HTTPS based mirrors in our database we scanned all existing public mirrors to see if they also provide HTTPS. With this the number of HTTPS URLs was increased from 24 to over 120.

The option to select which protocol the mirrorlist/metalink mirrors should provide is not yet running on the production instance.

The brave effort to create a Debian package for aseqjoy lead to a discussion on whether all parts of aseqjoy (and yes, there are not that many parts) come under the same terms and conditions. To resolve this ambiguity and finally release some dusted modifications sitting the git repository for ages, I finally released aseqjoy-0.0.2 today. Aside of addressing these legal matters aseqjoy now also supports emitting fine MIDI control change events with higher resolution.

Process Migration

Using CRIU it is possible to checkpoint/save/dump the state of a process into a set of files which can then be used to restore/restart the process at a later point in time. If the files from the checkpoint operation are transferred from one system to another and then used to restore the process, this is probably the simplest form of process migration.

Source system:

  • criu dump -D /checkpoint/destination -t PID
  • rsync -a /checkpoint/destination destination.system:/checkpoint/destination

Destination system:

  • criu restore -D /checkpoint/destination

For large processes the migration duration can be rather long. For a process using 24GB this can lead to migration duration longer than 280 seconds. The limiting factor in most cases is the interconnect between the systems involved in the process migration.

Optimization: Pre-Copy

One existing solution to decrease process downtime during migration is pre-copy. In one or multiple runs the memory of the process is copied from the source to the destination system. With every run only memory pages which have change since the last run have to be transferred. This can lead to situations where the process downtime during migration can be dramatically decreased.

This depends on the type of application which is migrated and especially how often/fast the memory content is changed. In extreme cases it was possible to decrease process downtime during migration for a 24GB process from 280 seconds to 8 seconds with the help of pre-copy.

This approach is basically the same if migrating single processes (or process groups) or virtual machines.

It Always Depends On…

Unfortunately pre-copy optimization can also lead to situations where the so called optimized case with pre-copy can require more time than the unoptimized case:
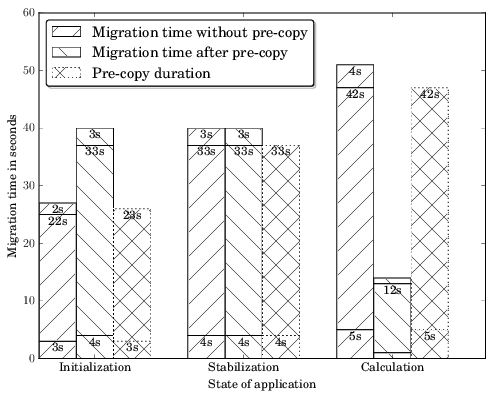
In the example above a process has been migrated during three stages of its lifetime and there are situations (state: Calculation) where pre-copy has enormous advantages (14 seconds with pre-copy and 51 seconds without pre-copy) but there are also situations (state: Initialization) where the pre-copy optimization increases the process downtime during migration (40 seconds with pre-copy and 27 seconds without pre-copy). It depends on the memory change rate.

Optimization: Post-Copy

Another approach to reduce the process downtime during migration is post-copy. The required memory pages are not dumped and transferred before restoring the process but on demand. Each time a missing memory page is accessed the migrated process is halted until the required memory pages has been transferred from the source system to the destination system:
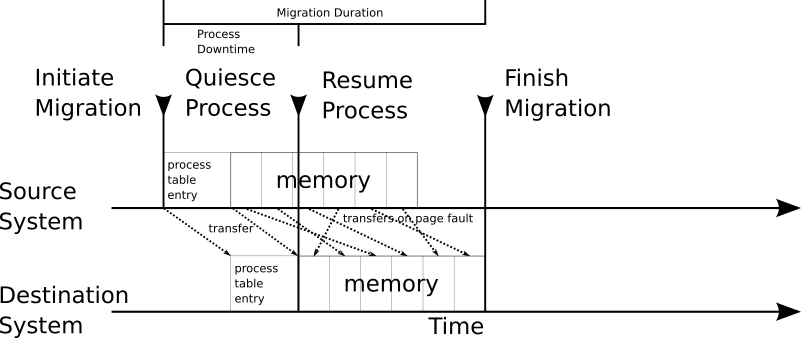
Thanks to userfaultfd this approach (or optimization) can be now integrated into CRIU. With the help of userfaultfd it is possible to mark memory pages to be handled by userfaultfd. If such a memory page is accessed, the process is halted until the requested page is provided. The listener for the userfaultfd requests is running in user-space and listening on a file descriptor. The same approach has already been implemented for QEMU.

Enough Theory

With all the background information on why and how the initial code to restore processes with userfaultfd support has been merged into the CRIU development branch: criu-dev. This initial implementation of lazy-pages support does not yet support lazy process migration between two hosts, but with the upstream merged patches it is at least possible to checkpoint a process and to restore the process using userfaultfd. A lazy restore consists of two parts. The usual ‘criu restore‘ part and an additional, what we call uffd daemon, ‘criu lazy-pages‘ part. To better demonstrate the advantages of a lazy restore there are patches to enhance crit (CRiu Image Tool) to remove pages which can be restored with userfaultfd from a checkpoint directory. Using a test case which allocates about 200MB of memory (and which writes one byte in each page over and over) requires after being dumped about 200MB. Using the mentioned crit enhancement make-lazy reduces the size of the checkpoint down to 116KB:

$ crit make-lazy /tmp/checkpoint/ /tmp/lazy-checkpoint
$ du -hs /tmp/checkpoint/ /tmp/lazy-checkpoint
     201M       /tmp/checkpoint
     116K       /tmp/lazy-checkpoint

With this the data which actually has to be transferred during process downtime is drastically reduced and the required memory pages are inserted in the restored process on demand using userfaultfd. Restoring the checkpointed process using lazy-restore would look something like this:

First the uffd daemon:

$ criu lazy-pages -D /tmp/checkpoint 
--address /tmp/userfault.socket

And then the actual restore:

$ criu restore -D /tmp/lazy-checkpoint 
--lazy-pages --address /tmp/userfault.socket

The socket specified with --address is used to exchange information about the restored process required by the uffd daemon. Once criu restore has done all its magic to restore the process except restoring the lazy memory pages, the process to be restored is actually started and runs until the first userfaultfd handled memory page is accessed. At that point the process hangs and the uffd daemon gets a message to provide the required memory pages. Once the uffd daemon provides the requested memory page, the restored process continues to run until the next page is requested. As potentially not all memory pages are requested, as they might not get accessed for some time, the uffd daemon starts to transfer unrequested memory pages into the restored process so that the uffd daemon can shut down after a certain time.

Process Migration

Using CRIU it is possible to checkpoint/save/dump the state of a process into a set of files which can then be used to restore/restart the process at a later point in time. If the files from the checkpoint operation are transferred from one system to another and then used to restore the process, this is probably the simplest form of process migration.

Source system:

  • criu dump -D /checkpoint/destination -t PID
  • rsync -a /checkpoint/destination destination.system:/checkpoint/destination

Destination system:

  • criu restore -D /checkpoint/destination

For large processes the migration duration can be rather long. For a process using 24GB this can lead to migration duration longer than 280 seconds. The limiting factor in most cases is the interconnect between the systems involved in the process migration.

Optimization: Pre-Copy

One existing solution to decrease process downtime during migration is pre-copy. In one or multiple runs the memory of the process is copied from the source to the destination system. With every run only memory pages which have change since the last run have to be transferred. This can lead to situations where the process downtime during migration can be dramatically decreased.

This depends on the type of application which is migrated and especially how often/fast the memory content is changed. In extreme cases it was possible to decrease process downtime during migration for a 24GB process from 280 seconds to 8 seconds with the help of pre-copy.

This approach is basically the same if migrating single processes (or process groups) or virtual machines.

It Always Depends On…

Unfortunately pre-copy optimization can also lead to situations where the so called optimized case with pre-copy can require more time than the unoptimized case:

In the example above a process has been migrated during three stages of its lifetime and there are situations (state: Calculation) where pre-copy has enormous advantages (14 seconds with pre-copy and 51 seconds without pre-copy) but there are also situations (state: Initialization) where the pre-copy optimization increases the process downtime during migration (40 seconds with pre-copy and 27 seconds without pre-copy). It depends on the memory change rate.

Optimization: Post-Copy

Another approach to reduce the process downtime during migration is post-copy. The required memory pages are not dumped and transferred before restoring the process but on demand. Each time a missing memory page is accessed the migrated process is halted until the required memory pages has been transferred from the source system to the destination system:

Thanks to userfaultfd this approach (or optimization) can be now integrated into CRIU. With the help of userfaultfd it is possible to mark memory pages to be handled by userfaultfd. If such a memory page is accessed, the process is halted until the requested page is provided. The listener for the userfaultfd requests is running in user-space and listening on a file descriptor. The same approach has already been implemented for QEMU.

Enough Theory

With all the background information on why and how the initial code to restore processes with userfaultfd support has been merged into the CRIU development branch: criu-dev. This initial implementation of lazy-pages support does not yet support lazy process migration between two hosts, but with the upstream merged patches it is at least possible to checkpoint a process and to restore the process using userfaultfd. A lazy restore consists of two parts. The usual ‘criu restore‘ part and an additional, what we call uffd daemon, ‘criu lazy-pages‘ part. To better demonstrate the advantages of a lazy restore there are patches to enhance crit (CRiu Image Tool) to remove pages which can be restored with userfaultfd from a checkpoint directory. Using a test case which allocates about 200MB of memory (and which writes one byte in each page over and over) requires after being dumped about 200MB. Using the mentioned crit enhancement make-lazy reduces the size of the checkpoint down to 116KB:

$ crit make-lazy /tmp/checkpoint/ /tmp/lazy-checkpoint $ du -hs /tmp/checkpoint/ /tmp/lazy-checkpoint  201M /tmp/checkpoint  116K /tmp/lazy-checkpoint 

With this the data which actually has to be transferred during process downtime is drastically reduced and the required memory pages are inserted in the restored process on demand using userfaultfd. Restoring the checkpointed process using lazy-restore would look something like this:

First the uffd daemon:

$ criu lazy-pages -D /tmp/checkpoint --address /tmp/userfault.socket 

And then the actual restore:

$ criu restore -D /tmp/lazy-checkpoint --lazy-pages --address /tmp/userfault.socket 

The socket specified with --address is used to exchange information about the restored process required by the uffd daemon. Once criu restore has done all its magic to restore the process except restoring the lazy memory pages, the process to be restored is actually started and runs until the first userfaultfd handled memory page is accessed. At that point the process hangs and the uffd daemon gets a message to provide the required memory pages. Once the uffd daemon provides the requested memory page, the restored process continues to run until the next page is requested. As potentially not all memory pages are requested, as they might not get accessed for some time, the uffd daemon starts to transfer unrequested memory pages into the restored process so that the uffd daemon can shut down after a certain time.

Having read about using syslinux as a boot-loader for virtual machines I tried to replace grub2 on one of the Fedora 24 virtual machines I am using with syslinux:

Not completely knowing what to do I did:

  • dnf install syslinux-extlinux.x86_64
  • /sbin/extlinux –install /boot/extlinux/

The I tried to create a configuration file using grubby:

  • grubby --extlinux --add-kernel=/boot/vmlinuz-4.4.6-300.fc23.x86_64 --title="4.4.6" --initrd=/boot/initramfs-4.4.6-300.fc23.x86_64.img --args="ro root=/dev/sda3"

Which resulted in:

# cat /etc/extlinux.conf 
label 4.4.6
 kernel /vmlinuz-4.4.6-300.fc23.x86_64
 initrd /initramfs-4.4.6-300.fc23.x86_64.img
 append ro root=/dev/sda3

I added following lines to the file manually:

default 4.4.6
ui menu.c32
timeout 50

After that I rebooted and the virtual machine was still using grub2 to load the kernel.

To write syslinux to the MBR following additional command was required:
dd if=/usr/share/syslinux/mbr.bin of=/dev/sda bs=440 count=1. I was a bit nervous rebooting the system after overwriting the MBR, but it rebooted successfully. The configuration file was also correctly updated after I installed a new kernel via dnf. I also removed grub2 (dnf remove grub2*) and was able to successfully reboot into the new kernel without grub2.

Having read about using syslinux as a boot-loader for virtual machines I tried to replace grub2 on one of the Fedora 24 virtual machines I am using with syslinux:

Not completely knowing what to do I did:

  • dnf install syslinux-extlinux.x86_64
  • /sbin/extlinux –install /boot/extlinux/

The I tried to create a configuration file using grubby:

  • grubby --extlinux --add-kernel=/boot/vmlinuz-4.4.6-300.fc23.x86_64 --title="4.4.6" --initrd=/boot/initramfs-4.4.6-300.fc23.x86_64.img --args="ro root=/dev/sda3"

Which resulted in:

# cat /etc/extlinux.conf label 4.4.6 kernel /vmlinuz-4.4.6-300.fc23.x86_64 initrd /initramfs-4.4.6-300.fc23.x86_64.img append ro root=/dev/sda3 

I added following lines to the file manually:

default 4.4.6 ui menu.c32 timeout 50 

After that I rebooted and the virtual machine was still using grub2 to load the kernel.

To write syslinux to the MBR following additional command was required:
dd if=/usr/share/syslinux/mbr.bin of=/dev/sda bs=440 count=1. I was a bit nervous rebooting the system after overwriting the MBR, but it rebooted successfully. The configuration file was also correctly updated after I installed a new kernel via dnf. I also removed grub2 (dnf remove grub2*) and was able to successfully reboot into the new kernel without grub2.

My son got a tiptoi. I was interested how it works and a little bit of googling lead me to this page. It provides a tool to create your own pages, books, adventures or puzzles. I gave it a try and this is the result.

a hand
result of 1st try with tttol

It does not look pretty and I could not print it in color, but the b/w version works. You can see the dotty area on each finger and on the i/o and play button. They contain the code that is read by the tiptoi pen. The example ha two modes. Mode one will just say the name of the finger when you touch it. Mode two can be activated by touching the play button on the lower right. If you touch the fingers in order starting with the thump it’ll tell the German poem “Das ist der Daumen …” or complain if the oder is not correct.

Find here the code:

product-id: 42
comment: das_ist_der_daumen
init: $spiel:=0
welcome: hallo
language: de
scripts:
 dau:
 - $spiel == 0? P(daumen)
 - $spiel == 1? $pos == 0? P(vdaumen) $pos := 1
 - $spiel == 1? $pos != 0? P(vnochmal,vanderer,vsicher,vhmmm)
 zei:
 - $spiel == 0? P(zeige)
 - $spiel == 1? $pos == 1? P(vzeige) $pos := 2
 - $spiel == 1? $pos != 1? P(vnochmal,vanderer,vsicher,vhmmm)
 mit:
 - $spiel == 0? P(mittel)
 - $spiel == 1? $pos == 2? P(vmittel) $pos := 3
 - $spiel == 1? $pos != 2? P(vnochmal,vanderer,vsicher,vhmmm)
 ring:
 - $spiel == 0? P(ring)
 - $spiel == 1? $pos == 3? P(vring) $pos := 4
 - $spiel == 1? $pos != 4? P(vnochmal,vanderer,vsicher,vhmmm)
 kle:
 - $spiel == 0? P(klein)
 - $spiel == 1? $pos == 4? P(vklein) $pos := 0
 - $spiel == 1? $pos != 4? P(vnochmal,vanderer,vsicher,vhmmm)
 spiel:
 - $spiel == 0? P(spiel_start) $spiel:=1 $pos := 0
 - $spiel == 1? P(spiel_end) $spiel:=0 $pos := 0
speak:
 hallo: "Hallo!"
 daumen: "Daumen" 
 zeige: "Zeigefinger" 
 mittel: "Mittelfinger" 
 ring: "Ringfinger" 
 klein: "kleiner Finger" 
 spiel_start: "Das Spiel wird jetzt gestartet. Beginne mit dem Daumen!"
 spiel_end: "Das Spiel wird jetzt beendet"
 vdaumen: "Das ist der Daumen!" 
 vzeige: "Der schüttelt die Pflaumen!" 
 vmittel: "der liest sie auf!" 
 vring: "der trägt sie nach Haus!" 
 vklein: "und der isst sie alle alle auf!" 
 vnochmal: "Versuchs nochmal!"
 vanderer: "Versuch einen anderen Finger!"
 vsicher: "Sicher?"
 vhmmm: "Hmmmm!"

As mentioned by Alex the link was down. Two things happened:

  1. The raspberry pi was not running anymore.
  2. The Internet connection was down.

For the second problem I don’t have a solution yet. For the not running raspberry pi there might be one:

The internal watchdog of the raspberry pi. It can be activated by loading the module, making sure it gets reloaded after a restart and installing the triggering software.

$ sudo modprobe bcm2708_wdog
$ echo "bcm2708_wdog" | sudo tee -a /etc/modules
$ sudo apt-get install watchdog

Configuration happens in the file

/etc/watchdog.conf

by uncommenting the following lines:

watchdog-device        = /dev/watchdog
max-load-1             = 24

This is a very basic configuration and it will restart the raspberry pi in case the load is above 24 for a 1 minute interval.

Activation of the demon can be done like this:

$ sudo service watchdog start

Specific in my case is the additional option to check whether the file, that was not working as mentioned above, is written to on a regular basis. This can be achieved by adding the following lines in the configuration:

file = /data/solar/solar.touch.start
change = 300
file = /data/solar/solar.touch.end
change = 600

Each “file” entry specifies a file that will be checked by the watchdog whether it’s been touched and the “change” entry specifies the time that the file can stay untouched before the watchdog will not be triggered any more and by that lead to a system reset. The first file is touched at the start of the script, the second one at the end. So in case the script for updating the yield data is not called any more the system will be reset after 5 minutes. If the script is started, but does not finish properly it’ll be reset after 10 minutes.

Time will tell how reliable the watchdog is.

After a long break I’ve started logging the PVIs in my father’s house again. The main reason for reactivating the scripts was that the two PVIs have shown different yield numbers at the end of the day. Further investigation has shown that the internal clock of one of the PVIs was wrong, so at around noon the yield counter was reset, which of course led to different results. Anyway the graphs are online now. Currently the graphs are generated using google charts. Hints for an alternative are welcome.

I’ve taken some pictures and short clip

wild animal
click on image for gallery

of the parrots living in the tree in front of my house.

After not even switching my IGEL for a very long time I finally got it running using thinstation and the service tsomatic to build the files instead of doing it on my own.  Unfortunately it takes longer to start and only run ssh than the desktop PC I own. Initially the idea was to have a machine that runs directly after switching on.  But it’s running and not used only as a display support any more.